Previous Deer Designers

Sunday, June 28, 2015

Tam's sharing her Project Life

Hi Everyone

Tammy here - Well I've been a bit quiet on the scrappy front - have been unwell and had no creative inspiration.  (sad face).
The last 2 days I have felt a little better and have been able to manage a project life spread or 2. 
I know I've said it before, but I love the 'non thinking' part of project life.  I love that I can just print off a few photos, select a few co-ordinating cards from my stash, write down a few thoughts about the week and hey presto!! I don't have to patiently, (or should I say impatiently)!! wait for paint/texture paste to dry!  I can cut and stick and call it done.

So here's one of the Weeks I've caught up on....


Here's the left side...
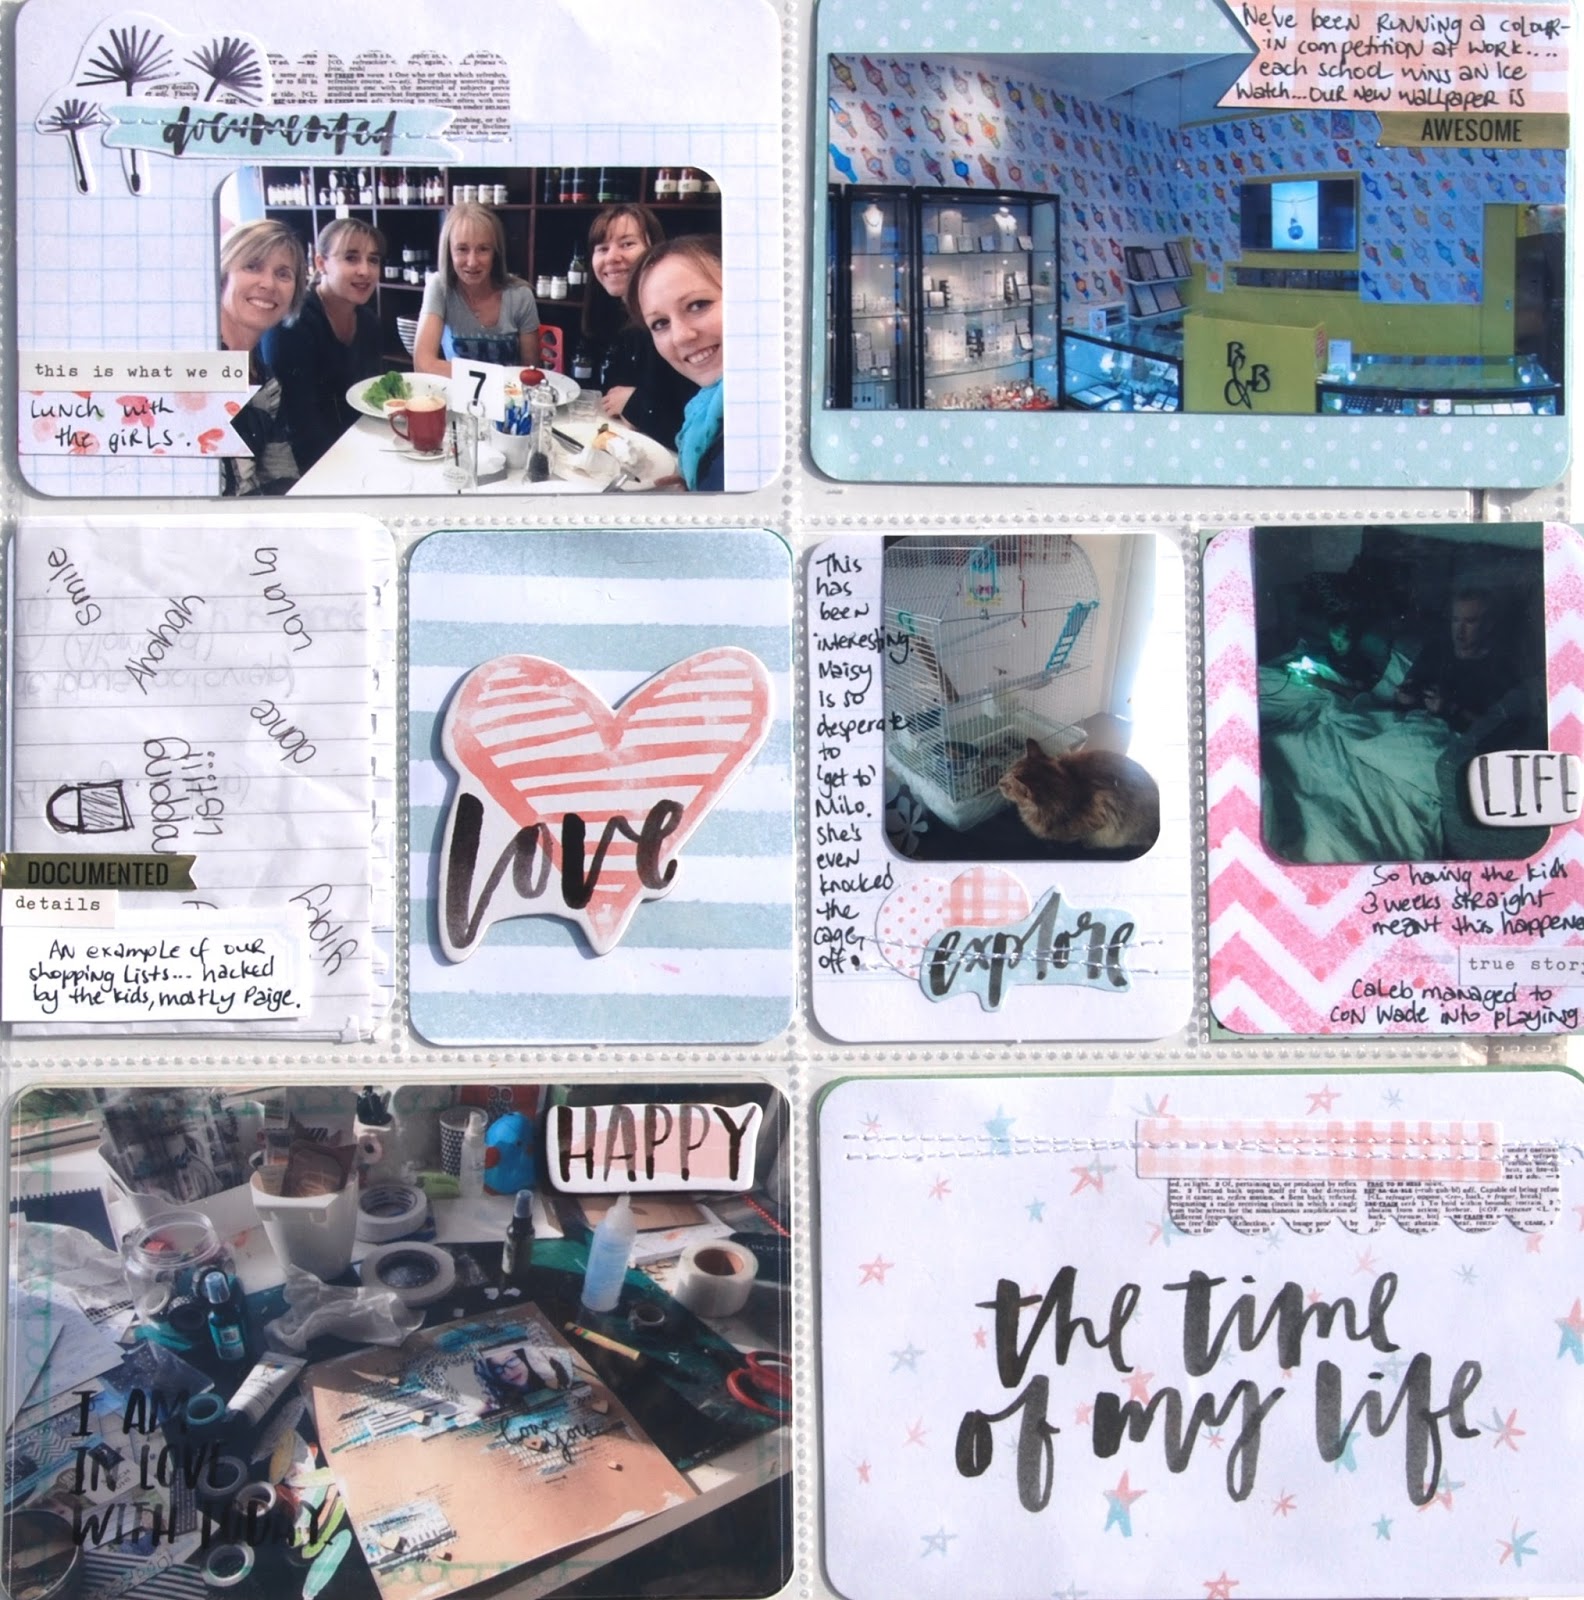

And the right....

 
And a close up.....
 
I really love the white in this layout...it pops!  I especially love the white cut-outs.  Yep -  me and my word obsession!  These cut-outs were from a couple of packs available from the lovely Debbie at Deer and Fawn.
 
Thanks so much for having a look!
I'll be back real soon to share some more pages.
 
Deer and Fawn products used:


Saturday, June 27, 2015

BOKEH BACKGROUND TECHNIQUE ~ LIZZY HILL

Hi there! Debbie kindly contacted me to ask if I'd like to share
with you lovely
scrappy folks how I create my BOKEH backgrounds.
You know, the sort of
'sun spot' look, like on these cards:
I was THRILLED to be asked & I hope you have a blast trying
it out!
I've created a very short video [under 4 minutes]!!!
But if you prefer a step by step, then keep reading:)
TUTORIAL
[NB: You can use any paper on hand, but I like to make my own!]
To create your paper, you will need the following:
Inks x 3 - I like to use 3 of a similar colour, but different tones.
Sponge or other applicator.
Rub the inks in at random. I usually start with my darker tone,
working to the lighter one last:
 
 Next, use a stencil/mask. Either a hand made one like mine, made from different sized
circle punches, or a bought one.
The plastic is from stamp packaging!
Using a sponge dauber or similar, apply
your ink:
Rubbing the ink in creates lighter circles.
Tapping creates darker circles.
I use a combination of both.
Begin with your larger circles, ending with the smallest
I find 3 sizes is fine. You can use four.
Also, you can do this with stars or hearts or any other shapes!
It's important to clean around each circle before you start the next
so you don't get smudges on your paper.
I use Stampin' Up white ink - but any is fine. Gesso, if it's heavy
bodied, works really well. Gelatos work too.
Experiment!
Below has the middle sized circles added. This technique looks best if
you OVERLAP your circles:
 
 Finally the small circles. Some people simply dab
straight on with the sponge dauber. I don't find this as clean-lined:
There are numerous You Tube videos etc on this technique.
The ones I found most helpful are the following links:
The link HERE is the one I discovered first. 
The link HERE shows how to make bokeh using circle STAMPS.
This one HERE uses a WATER COLOUR technique on the background,
which is awesome!
I hope this tutorial has been helpful & you have fun experimenting!
Cheers ~ & happy scrapping ~ Lizzy H

Thursday, June 25, 2015

Selfie!!!

Hi guys ....

Mid - week drop in to share a quick layout with you D&F peeps! ....

I am slowly starting to find my groove .... balancing my wonderful family, house stuff, new JOB & my art! ... To be honest... i'm doing more art than anything! ... lol
Practicing my sketching, trying new mediums & having so much fun doing it!
I really hope you enjoy this mid-week project! ......

Before's


" Selfie "
12x12 Scrapbook layout
by Connie Hatch.


Thanks for looking!

See you soon ...

Connie ...xxx

Products

Dylusions Ink Spray - White Linen
Becky Higgins - Project Life - Mix and Match - mini kit
Becky Higgins - Project Life - 6x6 Paper Pad - High Five
Kraft Scrapbooking Paper
Dollie
Book Paper
White Tissue Paper
Blue Paper Flowers
String/Twine
Flair Button
Metal Embellishment
Uni - Ball - Signo Pen - White


Sunday, June 21, 2015

HAPPY SUNDAY!

Hello to all my D&F peeps!

Have we all been keeping well? .. All been creating like crazy ladies? ... I hope so!
 2015 has NOT been my year! ... EVERYTHING has gone wrong & I am hoping the next part of the year will improve ... even just a little. In good news my darling hubby Mark found a new job after getting laid off 3 weeks ago .. He started this week! I am very happy not only do we have a income again, I don't have him under my feet all day long driving me NUTS! ... I swear he is worse than the kids!

Anyway.....

I posted on the Deer & Fawn Facebook page the other day, sharing the beginning of my new "GIRL". I was flipping through an old Cleo magazine and saw a model with her hands up in the air & intently know what I was going to do. I love how the smallest things can prompt inspiration.
Here is the first image ....


I use an old plastic gift card and scraped some Ceramcoat - Turquoise & Ceramcoat - OJ Orange on my art journal page, over lapping in some areas. I cut out my "arms" and found some "legs". I then started to playground with a dress. In the end you will see I changed my mind!

Here are a couple of progress photos I snapped when I remembered ....... 


Instead of one huge eye .... I went with some big LIPS!! ..... LOL

Ok drum roll ...... 


" I'M SO FANCY"
Art Journal Page
by Connie Hatch


I finished her off with some awesome hair, using a circle stencil and Zentangling in each circle. using a Dylusions stamp set for her hands. And just added some doodling on the background!
The title came from the song "FANCY" by Iggy Azalea. While I was making her dress, I just started singing this song to myself .. ( i do this a lot ) ... & is was PERFECT! ... do you agree?

Anyone who is interested in doing Mixed Media in a journal, Please let me or Debbie know! If I can get enough interested, I will run monthly classes teaching different techniques!

Thanks for stopping by!

See you later ...

Connie ...xxx

Products
Ceramcoat Paint - Turquoise
Ceramcoat Paint - OJ Orange
Ceramcoat Paint - Pretty Pink
Ceramcoat Paint - Laguna Blue
Ceramcoat Paint - Dunes Beige (skin)
Ceramcoat Paint - Passion
Ceramcoat Paint - Opaque Yellow
Dylusions Stamp Set - Depenable Dotty
Sharpie Paint Pen
Uniball SIGNO - Black Pen - Bold 207
Fude Ball 1.5 - Black
Uniball SIGNO - White Pen
Cheapo Gel Pen Set from Kmart ($2)
Scrap Paper
Cleo Magazine


Friday, June 12, 2015

Tam's take on the June Challenge

Hi Everyone
This month's challenge is a sketch  - I LOVE sketches! The fabulous Connie designed this one for the Deer and Fawn Challenge and I've been itching to have a go ever since I saw it.  Life's been so busy, and time is flying by,  however yesterday I MADE the time.

So in case you missed it, here's the sketch:
And here's my take on it:

 
I had so much fun with this one!
For those of you on facebook, I recently popped up a few pics as I'd finally treated myself and ordered the Prima Watercolour Pencils from my favourite online store Deer and Fawn.  I was so excited to get them, and they arrived just as we were heading away for the long weekend.  I threw them in with an art journal and managed to 'play' a little whilst away. 
I LOVE them! and just knew I needed to create some backgrounds with them.  They are so easy to use.
To create the background I actually applied some water with a paintbrush to the paper first, and then rubbed my wet brush into the lead of the pencils and kind of just dabbed it on.  I really loved the splodged natural look. 
To create the yellow circles, I drew and coloured in a circle directly to my page, and then went over it with a wet brush. This technique gives a more precise look.   Please note - I then drew a circle shape around the edge with a standard black biro.  I did try using a Sharpie Pen, but it ruined the pen - so please DO NOT try this at home! Lol. Just go with a standard biro.
I also drew circles around the edges of the cut out paper circles, with the Watercolour pencils, and applied a wet brush to this. 
Finally, I also coloured in my chipboard with the pencils and then applied water too. 
I love that these pencils are able to be used in so many ways. 
I also have lots of ideas for Project Life cards.
 
Here's a close up of my page:
 
 
And in case you missed it, here's a pic of my beloved pencils! 
Plus a few ideas I played with.

So have you had a go yet??  Don't forget there's a $30 Deer and Fawn voucher up for grabs!  What have you got to lose?
I look forward to seeing your entries.
Have a lovely weekend - hope there's some creative time in there for you.....

Love Tam
xx

Deer and Fawn Products used:
Prima Watercolour Pencils
Amy Tangerine Rotary Phrase Stamp - Shine
Deer and Fawn Arrow Word Wood Chips
Simple Stories Say Cheese Stickers

Tuesday, June 9, 2015

Behind in Project Life!!! Tammy's attempt to catch up!

Well I've gotten a little behind in Project Life ......aaargh! 
I've had a lot going on lately with extra work commitments and also teaching and preparing for Scrap Awrsome recently.  Add in to the mix,  family life and attempting to keep up with the kids and all their stuff, and well, yep sometimes it just doesn't happen!! 
I'm determined to catch up and not continue to fall behind, so in an attempt to create a quick double spread, I grabbed some white cardstock, the leftovers from my Deer and Fawn Project Life Inspire goodies, some spritz and stencils. 
Last months challenge at Deer and Fawn was all about creating your own project life cards.....I was hoping to get this post in for some added inspiration for everyone but alas it didn't happen! 
I really didn't overthink it, as I was focused on getting it DONE! I only used minimal colours, which is unusual for me. I spritzed a few cards using stencils, and some I just splodged with spritz.
I like the end result - the mix of the white with the pale pink and pale mint.  It keeps the focus on the photos and the journaling.
So without further ado.... 

 
And here's the left side....

And the right.....

So that's one down, only about 6 more to go!!!
Wish me luck!!!

Deer and Fawn Products: 
Project Life Inspire Overlays
Project Life Inspire 6x6 Paper Pad
Project Life Inspire Chipboard stickers
Project Life Inspire Die Cut Cards
Project Life Inspire Specialty Cards
Heidi Swapp Colorshine - Mint Green and Pink
Heidi Swapp Mini Stencils - patterns
Pretty Little Studio Gold Word Flag Stickers
Pretty Little Studio Gold Foil Star Stickers

Thursday, June 4, 2015

May Challenge Winner

Hi everyone...

Brrrrrr it's cold here today in Bannockburn, Vic.... enjoying being by the fire :)

I am very happy to announce the MAY CHALLENGE WINNER...
Congratulations Tracey Wright.....

You have been chosen by Connie, Tammy and myself as the winner of the MAY CHALLENGE YAY!!!!
We all LOVED your handmade feathers... GREAT WORK...

Please pm me to claim your voucher :)
Make sure you all enter the JUNE Challenge to be in the running to win a $30 voucher to spend on the website....

Thanks for stopping by

have a great day

Deb x

Monday, June 1, 2015

June Challenge!! ... " Because I LOVE Circles " ... Sketch Challenge.

Hi Guys!

Just dropping in to announce the June Challenge!

This month I decided to change it up a bit and design a "sketch" for all you Deer&Fawn Peeps!
I really want you guys to have some FUN with this sketch, and try and think out of the CIRCLE! (lol)

An AWESOME!!! $30 voucher to spend over at www.deerandfawndesigns.com.au is up for grabs!
Oh what I could buy with them $$$ ... :)

The Challenge ....

Create a layout, Project Life page, Mixed Media Art, Cards, or even an Off The Page Project, using my Sketch design. Easy! & FUN!!!

Enter your creations in the side bar - www.deerandfawndesigns.blogspot.com
by June 30!

Here is your sketch ...........


Sample Layout

" Tasmania "
Layout by 
Connie Hatch


Details


I am so EXCITED about this challenge!!

Can't wait to see what you all come up with ...... arrrrrrhhhh .. :)


See you later ...

Connie ... xxx